WORK IN PROGRESS (see the associated discussion on Steam)
Economy
Economy relates to the management of resources. In Battle Brothers, resources include ![]() (the game currency),
(the game currency), ![]() ,
, ![]() ,
, ![]() and
and ![]() . Mercenaries and equipment could also count as resources. But given their complexity, they will be studied on their own.
. Mercenaries and equipment could also count as resources. But given their complexity, they will be studied on their own.
At the start of a new campaign, players can set the economic difficulty and starting funds. The effects of each setting is displayed in the tables below:
| Beginner | - | - | 200 | 500 | 150 |
|---|---|---|---|---|---|
| Veteran | - | - | 150 | 300 | 100 |
| Expert | - | - | 150 | 300 | 100 |
| Contract rewards | Selling prices | Deserters | |
|---|---|---|---|
| Beginner | Higher | ||
| Veteran | |||
| Expert | Lower | Lower | Leave with their equipment |
| High | 2500 | 50 | 40 | 80 | 30 |
|---|---|---|---|---|---|
| Medium | 2000 | 50 | 20 | 40 | 20 |
| Low | 1500 | 50 | 10 | 20 | 10 |
Crowns
One, if not the most important goal in this game, the one that allows all other goals is to get more Crowns. They are the first and primary resource, a currency used in all transactions. 'Money buys everything' is true in Battle Brothers as well!
Low cash reserves however are a serious threat to the survival of a company whose growth requires funds to cope with increased combat difficulty and various setbacks. That makes economy management, the earning and spending of money, a priority.
Contracts
The main source of income in the early stages of the game is Contracts (see the relevant section for more information). As we've seen, Contract rewards are tied to the Economic difficulty. On Beginner, Contracts will pay more and on Expert, they will pay less.
But there are other variables that influence Contract rewards[1]:
- Contract type
- Contract difficulty rating (skulls)
- Negotiating or Haggling
- Renown
- Small random factor
What does influence Contract difficulty rating?
- Higher renown unlocks more (and usually more difficult) contracts, and it scales contract rewards.[2]
— Developer Christof aka Rap
This is proof enough that there are only benefits to increase Renown as much and as early as possible. Here's a summary on what affects Renown (values taken from Wiki page):
| Battle Won | Camp Destroyed | Ambition Completed | Retreat | Contract Canceled |
|---|---|---|---|---|
| 5 | 10 | 100 | -15 | -75 |
- Renown does not factor into contract difficulty [number and type of enemies, not difficulty rating], but it does factor heavily into contract rewards; the more renown you have, the more you'll be paid.[3]
— Developer Christof aka Rap
What does influence contract difficulty (number and type of enemies) then?
- Contract difficulty scales with time, the strength of your roster, the difficulty rating (skulls), the type of contract, and some factors specific to the type of contract – for example, escort contracts are generally more difficult the longer you travel, as it increases the chance to run into enemies.[3]
— Developer Christof aka Rap
But how is Roster strength calculated? Tests made by player Drathnar seem to indicate that it corresponds to the Roster average level[4]. Adding fresh recruits to a Roster full of Veterans would thus lower Roster strength! On the other hand, keeping a 12 men force to fight all battles would be the fastest way to increase enemy power.
What about Negotiations? There are three options:
- We need to be paid more for this (no special mode of payment)
- We need (more) payment in advance
- We need more payment once the work is done (only available if payment in advance is currently offered and cannot be selected two times in a row)
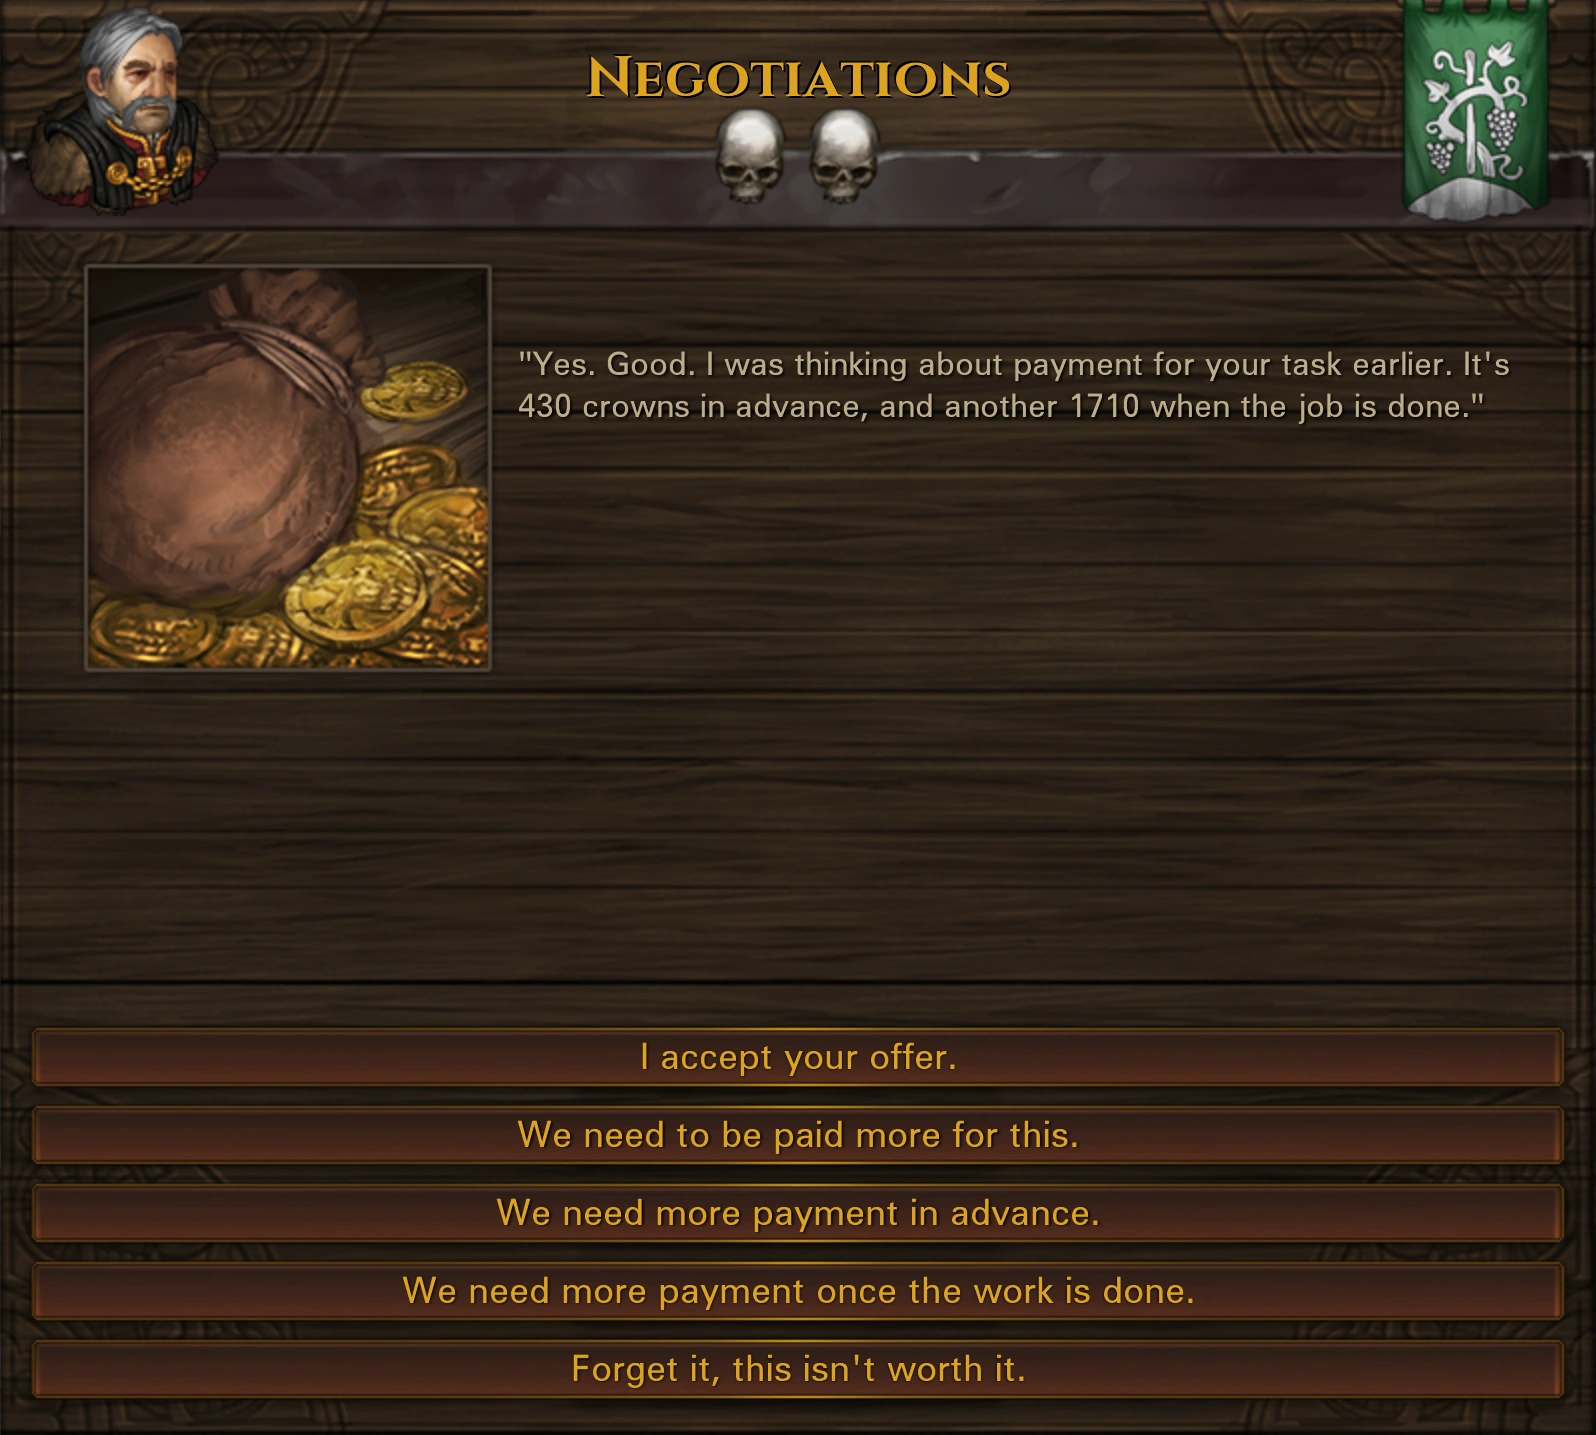
Each of these three modes are exclusive. It's counterproductive to jump back and forth between them (and unlikely to work at all) so stick to one.
Once the 'in advance' payment mode is set you can ask for more payment while retaining the payment mode.
I've summed up the financial (approximate) effects of each option:
| More | Advance | More Advance | Work Done |
|---|---|---|---|
| +3% to +10% of base | -6% of base | -6% of base & +3% to +10% of advance | = base |
Now, negotiating should be carefully conducted. You can always safely haggle once. But keep asking for a bigger reward and the employer may get impatient. Once he's left negotiations, the contract is taken away and Relations with the Settlement will take a hit.
So, how long exactly can you keep pushing for more before that happens?
| Attempt 1 | Attempt 2 | Attempt 3 | Attempt 4 |
|---|---|---|---|
| Always | Average | Very Rare | Impossible? |
How likely is it then to get a positive answer?
| Once | Twice | Thrice |
|---|---|---|
| Average | Rare | Impossible? |
Negotiations can have a negative effect on Relations.
| More | Advance | More Advance | Work Done | Failure |
|---|---|---|---|---|
| -1% | = | = | = | -3% of contract type -1% of other type (civilian or noble) |
Loot
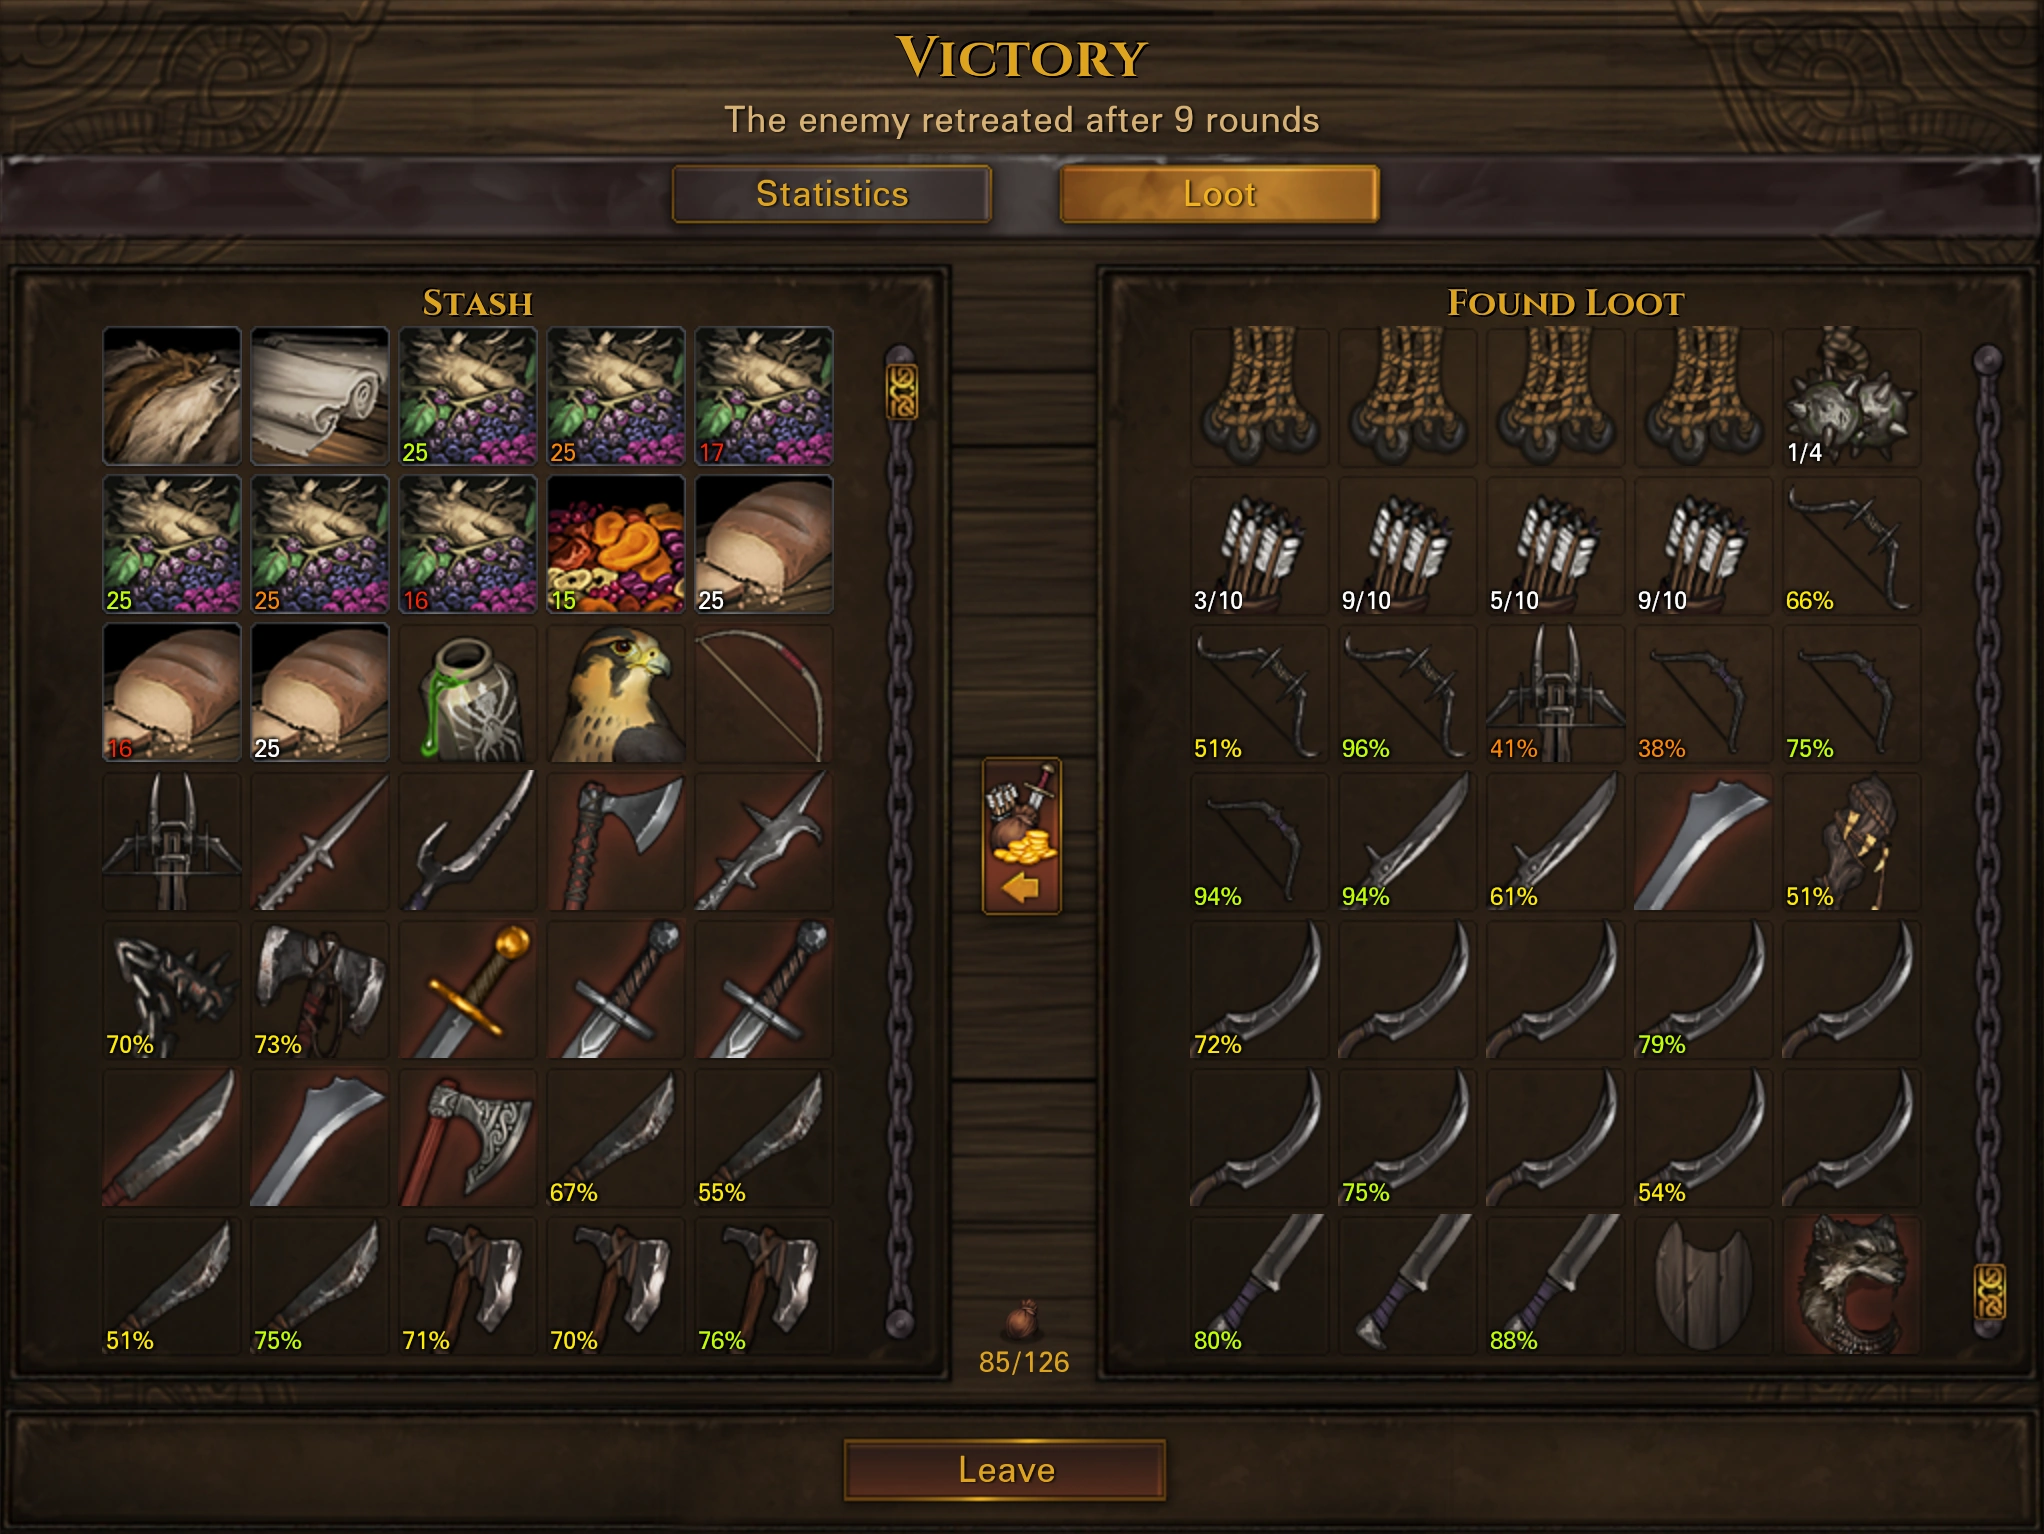
Loot can be as financially rewarding as Contracts depending on the number and type of enemies fought. Everything that's left after a successful battle and that can be sold can be defined as Loot. Crowns are Loot in a way too. The most liquid you can get. It follows that winning more battles and killing more enemies with expensive equipment will net more and better Loot.
There are different types of Loot. The first kind can be used which includes items like Weapons, Armor and other resources. The second kind can only be sold or bought. That category contains Trade Goods, Treasure and Trophies from Beasts. While Trade Goods and Treasure sell for their worth, Trophies like all other items that can be sold, only sell for a fraction of their worth.
- Because looting golden chalices, ornate tomes and gemstones feels more satisfying than mundane money every time, we’ve added a number of loot items for you to plunder.[...]You may find treasure at all kinds of locations, of course, but there’s now a few locations well-hidden and littered around the world that contain vast amounts of treasure, including pieces of unique equipment.[5]
— Dev Blog #66: Progress Update – Putting the Pieces Together
Tavern rumors will sometimes indicate a location containing Treasure. These rumors rule out the possibility of said location to have Named Items. In short, it's possible to find both Named Items and Treasure if the rumor explicitly talks about Named Items but not the other way around.
The Lindwurm's Hoard Treasure cannot be found in locations but rather on slain Lindwurms.
Selling Loot can be more or less rewarding depending on its type and worth. But the worth of an item also depends on Durability if it has any. It means that Weapons, Shields, Armor and Helmets will sell for more if they're undamaged. So, is it worth it to repair the damaged ones?
1![]() repairs 15 Durability. There are thus three parameters to account for in the calculation:
repairs 15 Durability. There are thus three parameters to account for in the calculation:
- Item Worth
- Item maximum Durability
The following table shows a list of Loot with Durability. The 'W/D' row represents Worth per unit of Durability. The 'W/20T@17%' row represents the return on a 20 ![]() stack investment at a price modifier of 17% (default average modifier in Cities and Strongholds). Values that are higher than what a stack costs are a profit.
Items with a very low return, that is a W/D of less than 5 were removed from the table.
stack investment at a price modifier of 17% (default average modifier in Cities and Strongholds). Values that are higher than what a stack costs are a profit.
Items with a very low return, that is a W/D of less than 5 were removed from the table.
| Name | Worth | W/D | W/20T@17% |
|---|---|---|---|
| Heavy Crossbow | 3200 | 50 | 2,550 |
| Noble Sword | 3200 | 44.4 | 2,267 |
| Fighting Axe | 3000 | 37.5 | 1,913 |
| Fighting Spear | 2500 | 34.7 | 1,771 |
| Crypt Cleaver | 1600 | 33.3 | 1,700 |
| Masterwork Bow | 3500 | 31.8 | 1,623 |
| Khopesh | 1300 | 31 | 1,579 |
| Rhomphaia | 1300 | 31 | 1,579 |
| Greatsword | 2200 | 30.6 | 1,558 |
| Greataxe | 2400 | 30 | 1,530 |
| War Bow | 2900 | 29 | 1,479 |
| Warbrand | 1800 | 28.1 | 1,434 |
| Spiked Impaler | 2000 | 27.8 | 1,417 |
| Winged Mace | 2100 | 26.3 | 1,339 |
| Man Splitter | 1600 | 25 | 1,275 |
| Warhammer | 2500 | 25 | 1,275 |
| Military Cleaver | 1900 | 23.8 | 1,211 |
| Battle Standard | 1500 | 23.4 | 1,195 |
| Head Chopper | 1200 | 23.1 | 1,177 |
| Arming Sword | 1250 | 22.3 | 1,138 |
| Coat of Plates | 7000 | 21.9 | 1,116 |
| Berserk Chain | 1300 | 20.3 | 1,036 |
| Ancient Sword | 850 | 20.2 | 1,032 |
| Coat of Scales | 6000 | 20 | 1,020 |
| Gnarly Staff | 500 | 20 | 1,020 |
| Bladed Pike | 600 | 20 | 1,020 |
| Jagged Pike | 800 | 20 | 1,020 |
| Flail | 1400 | 19.4 | 992 |
| Billhook | 1400 | 19.4 | 992 |
| Warscythe | 700 | 19.4 | 992 |
| Head Splitter | 1200 | 18.8 | 956 |
| Heavy Lamellar Armor | 5000 | 17.5 | 895 |
| Cruel Falchion | 900 | 17.3 | 883 |
| Scale Armor | 4000 | 16.7 | 850 |
| Long Axe | 1200 | 16.7 | 850 |
| Two-Handed Hammer | 2000 | 16.7 | 850 |
| Heraldic Hauberk | 4000 | 16 | 816 |
| Crossbow | 750 | 15.6 | 797 |
| Decayed Coat of Plates | 4000 | 15.4 | 785 |
| Ancient Plated Scale Hauberk | 3200 | 15.2 | 777 |
| Pike | 900 | 14.1 | 717 |
| Ancient Plate Harness | 2800 | 14 | 714 |
| Broken Pike | 350 | 13.5 | 687 |
| Decorated Full Helm | 4000 | 13.3 | 680 |
| Decayed Coat of Scales | 3200 | 13.3 | 680 |
| Hand Axe | 900 | 13.2 | 675 |
| Lamellar Harness | 3000 | 13 | 665 |
| Hooked Blade | 700 | 12.7 | 649 |
| Ancient Scale Coat | 2400 | 12.6 | 644 |
| Scramasax | 700 | 12.5 | 638 |
| Boar Spear | 750 | 11.7 | 598 |
| Full Helm | 3500 | 11.7 | 595 |
| Military Pick | 900 | 11.3 | 574 |
| Ancient Plated Mail Hauberk | 2000 | 11.1 | 567 |
| Closed Flat Top with Mail | 3000 | 10.7 | 546 |
| Falchion | 500 | 10.4 | 531 |
| Flat Top with Closed Mail | 2600 | 9.8 | 500 |
| Reinforced Mail Hauberk | 2000 | 9.5 | 486 |
| Kettle Hat with Closed Mail | 2200 | 8.8 | 449 |
| Nasal Helmet with Closed Mail | 2000 | 8.3 | 425 |
| Woodcutter's Axe | 400 | 8.3 | 425 |
| Morning Star | 600 | 8.3 | 425 |
| Goblin Skewer | 300 | 8.3 | 425 |
| Broken Ancient Sword | 200 | 8.3 | 425 |
| Falx | 245 | 8.2 | 417 |
| Reinforced Boondock Bow | 500 | 8.1 | 411 |
| Rondel | 400 | 8 | 408 |
| Notched Blade | 350 | 8 | 406 |
| Decayed Great Helm | 2000 | 7.8 | 400 |
| Flat Top with Mail | 1800 | 7.8 | 399 |
| Reinforced Wooden Flail | 300 | 7.5 | 383 |
| Hunting Bow | 600 | 7.5 | 383 |
| Light Crossbow | 300 | 7.5 | 383 |
| Shortsword | 350 | 7.3 | 372 |
| Kettle Hat with Mail | 1500 | 7 | 356 |
| Closed and Padded Flat Top | 1250 | 6.9 | 354 |
| Bascinet with Mail | 1400 | 6.7 | 340 |
| Mail Hauberk | 1000 | 6.7 | 340 |
| Ancient Breastplate | 900 | 6.7 | 340 |
| Direwolf Mail Armor | 900 | 6.4 | 328 |
| Decayed Full Helm | 1500 | 6.3 | 319 |
| Nasal Helmet with Mail | 1250 | 6.3 | 319 |
| Ancient Scale Harness | 750 | 6 | 306 |
| Closed Flat Top Helmet | 1000 | 5.9 | 300 |
| Decayed Reinforced Mail Hauberk | 1000 | 5.9 | 300 |
| Zweihander's Helmet | 850 | 5.7 | 289 |
| Ancient Honor Guard Helmet | 1000 | 5.6 | 283 |
| Decayed Closed Flat Top With Mail | 1250 | 5.4 | 277 |
| Padded Flat Top Helmet | 800 | 5.3 | 272 |
| Cudgel | 350 | 5.1 | 263 |
| The Fangshire | 300 | 5 | 255 |
| Direwolf Hide Armor | 500 | 5 | 255 |
| Mail Shirt | 650 | 5 | 255 |
As can be seen from the data, Weapons are the most profitable items to repair. They are followed by Armor and then Helmets. A Boar Spear has the same return than a Full Helm!
This table shows that attacking targets like Orcs, Soldiers, Mercenaries or in general any Faction with high tier equipment is well worth it in terms of Loot value. On the contrary, Beasts carry no equipment and will only leave low value Trophies that can be used as crafting components.
Undamaged Loot does not need repairing. In that case, Worth is the only parameter determining profitability which benefits Armor and Helmets. Taht's why successfully retrieving undamaged Armor from enemies is very rewarding. That can be done for both Armor and Helmets by using Daggers Puncture, a skill that completely ignores armor. And to retrieve Armor only, by using Flails Lash, a skill that directly targets the head.
Items that belonged to slain enemies are not always available as Loot.
- Loot will only show up if its durability has not been reduced to zero during the fight. Armor or helmets that got reduced to zero will be considered destroyed in combat just as shields that had their hitpoints reduced to zero.[6]
— Developer Christof aka Rap
The chance to obtain them seems to be tied to their Durability. These items can be more or less damaged at the start of the battle and get even more so with each strike. So it's never guaranteed they will drop. To maximize the chance they do, enemies should be felled as quickly as possible. It's always possible to know, after having killed its owner, if an item was destroyed or not by checking what has been left on the ground. If the item is there, it will show up as loot at the end of a successful battle (unless you picked said item from the ground).
Events can also reward Loot, for example:
Trade
Trade can be either very profitable or not at all depending on a map, its Settlements and their location.
- The best thing to do is carefully look around your map seed. Locate resources attached to settlements and possibly trade routes. Try to make money from trade initially if you can as it's very low risk.[7]
— Player Barahur
Trade is ultimately unreliable and should mostly be seen as a secondary source of revenues.
Trade Goods like Treasure sell for their full worth. They are however still subjected to prices variations. Obviously, bigger profits come from buying cheap, discounted goods and selling at a premium rate. Besides Worth, items selling value is also affected by the Settlement type and the party Relations with it.
As is explained in detail here, Cities are the best places to sell Trade Goods and Loot of any kind. Buying however should be done in Small Villages and from Settlements with buildings producing the goods to buy.
Stocks will replenish after a period of time that can extend to 3 days.
- Locations restock after 3 days based on their resources at that time. Certain events, like being raided, also forces a restock with a smaller selection.[8]
— Developer Christof aka Rap
Player Drathnar has an interesting view on Trading:
- I generally don't really find it that profitable to do trading just for trading's sake, unless your map has lots of places producing trade goods.Yes, you'll make some gold, but you also need to deduct daily wage and food expenses for the men for the time you need to travel to a proper city hall to sell those goods. Also very occasionally there are unfavorable settlement statuses at your destination and no ready contract to clear them, which can really put a dent in one's plans for trade.
So usually what I do is I plan my next destination according to contracts I can pick up. But I do buy any trade goods in town which are cheap. Hopefully at some point, when I visit a City Hall settlement, I'll dump all my items and goods there.[9]— Player Drathnar
He follows up on the importance of managing inventory space to maximize earnings and avoid opportunity costs:
- As you progress through the game, foes will drop better gear and the benefit of trade goods needs to be compared whether it is worth occupying that slot. For example, you might buy Peat Bricks at 111G and sell for 131G at a City Hall, but if you're killing enough brigands and getting good loot, having that slot for say an extra Hatchet that you would have otherwise discarded would net you 37G extra gold. And Hatchets are of course just tier 1 weapons. If missing out on tier 2 weapons, the opportunity cost would be much larger.[9]
— Player Drathnar
Expenses
Cutting expenses is another reliable way to stay financially healthy. But some expenses are hard to reduce. There are two main sources of expenses:
- Purchases
- Wages
Purchases
Purchases cover everything that's bought from Supplies to other items like Weapons and Armor and upfront payment (which depends on Level and equipment) for recruits. That first item of expenditure is highest in the early game when fresh members need equipment. That is when investing ensures that you will not otherwise spend more later.
Armor is the most difficult item to loot in the early game because low level recruits cannot afford to puncture enemies and get injured or even killed in the process. That's why buying cost effective Armor like Padded Leather with the starting funds is a sound choice.
Later in the game, premium Character Backgrounds like Hedge Knights can be hired. They most often come with high tier Armor and Weapons. Recruiting them means buying equipment.
Weapons are easier to get than Weapons because hitting the enemy won't damage them. Player Gazomierz gives good advice on that matter:
- Another reason not to buy stuff is rather simple, most of it can be looted. You can equip your entire band with mail [armor] and tier[]2 weapons on raiders alone. And that's what you should aim for.[10]
— Player Gazomierz
Damaged items have a reduced price. Is it worth it to buy them? In order to know, use the table provided in the Loot section. The higher the Worth per Durability, the more interesting it is.
Besides equipment, purchases include Supplies:
- Provisions
- Tools and Supplies
- Ammunition
- Medical Supplies
Provisions are the only vital resource. This item of expenditure cannot really be saved upon or people will get Angry and desert the company. The amount that's needed can only be reduced by dismissing mercenaries or by buying cheaper types of Provisions like Ground Grain.
Tools and Supplies can be a major item of expenditure if enemies keep hitting party members and if the player keeps repairing damaged equipment. On that subject, Gazomierz has some insight:
- It's not really worth it to repair most of low tier gear as it's just so easy to replace it. Use one weapon, once it brakes switch to the next one.[10]
— Player Gazomierz
This can be said for Armor as well once the player feels comfortable enough to get regular replacements from enemies by using Daggers Puncture or Flails Lash skill.
- With [armor] it's a bit more tricky. You don't loot as much of it as you loot weapons. But if you have spare suits of low tier [armor] you can do the same thing. Just switch when it gets low. You're aiming at mail anyway, so [until] that just try to minimize [usage] of tools.[10]
— Player Gazomierz
Getting hit will not only damage equipment but may also cause Temporary Injuries if enough damage to Hit Points has been dealt. They can only be healed by Medical Supplies. Each day spent healing requires 1 ![]() . These Temporary Injuries can really incapacitate a mercenary for a long time, enough that dismissing him could be a safe financial choice.
. These Temporary Injuries can really incapacitate a mercenary for a long time, enough that dismissing him could be a safe financial choice.
Temporary Injuries and the costs they incur can be avoided by increasing Hit Points on Level up or with Perks like Colossus.
Ammunition expenses can rise up fast if several recruits are using Bows with Quick Shot. It is advised to mostly stick to Crossbows in the early game and slowly switch as the campaign progresses. Crossbows have better aim and use only 1 ![]() per attack.
per attack.
Last but not least, Taverns will provide services for a fee. It's usually not worth it in the beginning to pay for those. Drinks will increase Morale but only for a short time until it goes back to normal.
Wages
Wages can go out of hand quickly if left unchecked. The Roster size, the Character Backgrounds and their Level, the Greedy Trait and related Events define how high the wages will be.
Only 12 mercenaries can join a battle. So, keeping a count that is close to this number in the early stages of a campaign will do financial wonders. Not only in terms of wages but also in terms of Provisions consumed because each character requires 2 (?) ![]() per day.
per day.
Roster
Recruiting
Leveling
Perk analysis
Builds
Equipment
Named Items
Named Items are stronger versions of the best normal weapons, armors and shields. All parameters (except Vision and Range) can be improved but how many are and by how much will determine how good and influential the named item is.
- Their stats are slightly randomized to excel in different areas and some of them are plain better than others.
— Dev Blog #45 - Named Items
But where can they be found? There are four main sources they can be acquired from:
On Enemies
| Hedge Knight | Knight | Swordmaster? | Master Archer | Brigand Leader | Orc Warrior Orc Warlord |
|---|---|---|---|---|---|
| ? | |||||
It's worth noting that Hedge Knights have a high chance to carry either a Named Two-Handed Axe or a Named Sword. The other weapons however and those of other enemies have a very low chance to appear. Since Orc Warriors are much more common than the other enemies though, it's easier to get a Named Item from them as it is to get one from Master Archers for example.
Items that belonged to slain enemies are not always available as loot (see the Loot section).
In Enemy Locations (Camps, Ruins, Etc.)
- The harder and further away from civilization a location is, the higher the chance that you'll find named items as loot there.[11]
— Developer Christof aka Rap
What kind of chances?
These can range from 0% (and even negative numbers!) to 60% or more. The exact chances are displayed in the log (...\Documents\Battle Brothers) when a location spawns on the map.
There is even a chance to get two (maybe more?) Named Items instead of only one.
Tests made by player Wolfenstahl have shown that a Named Item that was attached to a location got removed from it after accepting a contract to destroy the same location.[12]
Taverns rumors can point out locations with a Named Item. They will give out hints about the type of item that can be found there as well as the kind of enemies that occupy it. And they will give a general direction by which to find the location. It is unsure whether the rumor itself creates and attaches a Named Item to a location or whether it simply reveals it.
While only some Named Items can be found on specific enemies and in Shops, any one of them can appear in enemy locations.
Generated map layouts are stored in map seeds. Creating a new campaign with a same map seed will thus always produce the exact same map layout. Named Items attached to initial locations will likewise always be found at the same place.
In Specialized Shops
- To make browsing specialized shops more interesting and also worth it later in the game, you’ll now be able to sometimes find unique named weapons on offer – for kingly prices, of course.[13]
— Dev Blog #67: Progress Update – Specialized Shops
All items Shops but the Market have a slight chance to offer up to three Named Items for sale for a limited period of time which can extend to 3 days before the stock gets replenished.
- Locations restock after 3 days based on their resources at that time. Certain events, like being raided, also forces a restock with a smaller selection.[8]
— Developer Christof aka Rap
Weaponsmiths can sell all types of Named Melee Weapons (but not Named Shields) and Fletchers can sell all types of Named Ranged Weapons. But some Named Armors cannot be found in Armorers, including:
Prices vary a lot depending on the worth of an item. Named Armors are the most expensive Named Items. Positive Settlement Statuses will not only affect prices but can also increase Shops stocks as well as the likelihood they will offer Named Items. These are:
- Well Supplied

- Safe Roads
- High Spirits
Whether or not these Settlement Statuses appear is also (apparently) random.
Negative Settlement Statuses, to the exception of Disappearing Villagers ![]() and Ambushed Trade Routes
and Ambushed Trade Routes ![]() , will prevent Named Items from appearing in Shops.
, will prevent Named Items from appearing in Shops.
Fletchers are usually less numerous than Weaponsmiths. But since the selection of Named Melee Weapons is higher than the selection of Named Ranged Weapons the chance to get a specific Named Weapons does not favor or disfavor one or the other type.
From Events
A Historian is needed for the item to be named.
Without a Historian the map will not always be readable.
It will either reward a Named Armor or a Named Helmet
Depending on dialog choices, it will either reward a Named Armor or a Named Weapon among a limited selection.
- Messenger from Rival House
- Graverobbers Offer Map (possibly)
Combat
First Month Walkthrough (possibly)
References
- ↑ Dev Blog #95: Contract Changes
- ↑ Developer Post
- ↑ 3.0 3.1 Developer Post
- ↑ Effect of Roster Strength on Contract Spawned Enemy Sizes
- ↑ Dev Blog #66: Progress Update – Putting the Pieces Together
- ↑ Developer post in Why does most of the loot not appear in the end of battle screen?
- ↑ Player Barahur in Running out of money on Expert. Help Needed!
- ↑ 8.0 8.1 Developer Post in Vendors not resupplying?
- ↑ 9.0 9.1 Player Drathnar in Trading strategies?
- ↑ 10.0 10.1 10.2 Player Gazomierz in Help with money!
- ↑ Developer Post
- ↑ Possible issues with locations and legendary [named] items?
- ↑ Dev Blog #67: Progress Update – Specialized Shops