
Some weapons' parameters, skills, perks have not been updated since 'Blazing Deserts' (2020) and 'Of Flesh and Faith' (2022) DLCs.
Tactical turn based combat is the heart of Battle Brothers. The battlefield is a hex-tiled grid, with elevation, obstacles/terrain considerations and zone of control mechanics. An Action Point (AP) system limits the number of actions (movement, skill use) a unit can take each round and an initiative-based system determines the order in which combatants act out their turns.[1]
The character with the highest initiative will start first in a battle round, followed by characters with lower initiative. As initiative is lowered when a character builds up fatigue or has a penalty to max. fatigue (due to armor/weapons or other effects), his turn may move from first to last very quickly, if he gets fatigued too fast and the enemies do not.
Action Points (AP)[]
AP is spent by actions (moving, striking, using special skills/consumables, etc) and refreshed at the start of the every round. All brothers and most enemy units have 9AP. A few have less (ie Wiedergangers) and some have more (ie Direwolves, Goblin Wolfriders).
Movement on flat ground (Grass/Plains/Roads) costs 2AP. Rough terrain such as Forest/Snow have tiles that typically cost 3AP (there are tiles that still cost 2AP though (ie Light Snow)). Swamp costs 4AP for tiles with Murky Water. Changing elevation adds a further +1 to AP cost per tile. Most strikes from 1-handed weapons use 4AP (exception: Dagger (with Mastery) uses only 3AP) and strikes from 2-handed weapons use 6AP (exception: Warbrand, Rhomphaia and 2-Handed Cleavers use 4AP on regular strikes; Jagged Pike uses 5AP).
A typical battle starts with both parties in a line formation (1-2 lines deep for your forces, may be deeper for the enemy), with at least 5 hexes between parties. Human forces cannot close to melee distance within 1 round as traversing a hex takes a minimum of 2AP. Direwolves and Goblin Wolfriders on the other hand can definitely close the gap in 1 round. As bows have a range of 7 tiles on the flat (8 with mastery) and crossbows have a range of 6 tiles, both sides start the 1st round within firing distance of ranged combatants.
Fatigue[]
Apart from AP, all weapon strikes and movement on the battlefield also cost fatigue to execute, therefore a fully fatigued character can neither strike nor move. Every character recovers 15 fatigue at the start of his turn. As per full release version 1.1, dodging blows also increases Fatigue by 2 and getting struck by a blow increases Fatigue by 5.
Zone of Control (ZoC)[]
Melee units - units with a melee weapon, bare fists, or beasts (except for alps and hexes) - exert a Zone of Control on tiles directly adjacent to them. Any unit trying to leave a tile under Zone of Control will suffer automatic strikes from the hostiles controlling the ZoC (at no fatigue cost for the controlling unit). If all strikes miss, the unit leaves the tile. If any strike hits, the attempt to leave the tile fails and the unit has to try again.
A unit using any kind of ranged weapon (i.e. bow, javelins), a fleeing or stunned unit does not exert a Zone of Control. A smoke pot removes the ZoC from affected tiles for 1 turn. Footwork skill allows to move through ZoC safely. Rotation skill allows a unit to leave the ZoC by swapping positions with another non-hostile unit. Entangled, horrified, and sleeping units lose their ability to exert their ZoC.
To-Hit Chance[]
- See also: Hit Chance
Base chance to hit (shown after selecting a skill and mousing over a target) is essentially: melee skill of brother subtracted against base melee defense of target. [2]
This is further modified by various factors listed below.
- Gear, elevation and surround bonuses are factored in additively. (ie an attacker with Melee Skill of 70 striking a defender with Melee Defense of 0 will have 70% hit chance. If said attacker had another friendly unit adjacent/surrounding the defender, he would get +5% or in other words his hit chance would be 75% instead)
- Morale bonuses/penalties and injury penalties are factored in multiplicatively (ie an archer with 86 Ranged Skill at Steady will have effectively 94 Ranged Skill at Confident (+10%))
Defense is improved by shields (mentioned below), various perks like Dodge, Shield Expert, Reach Advantage, etc. However, it is also subject to diminishing returns stat-wise at values beyond 50: each Melee Defense attribute point over 50 is halved.[3] [4]
When an attack is made, a regular d100 roll happens (a procedure to get a random number in the range of 1 to 100). If the number is lower than the to-hit % chance, then this is a hit. At this point, a second d100 roll is made to see if it the attack hits the head. [5]
Gear[]
- Weapons with hit bonuses include, for example, pitchforks, pikes and the Battle Standard with a +10% chance when using the "Impale" skill.
- Weapon skills like Slash (+10% hit chance, available for swords) or Thrust (+20% hit chance, available for spears)
- Shields confer strong defense bonuses which significantly lower the hit chance of anyone attacking someone who has a shield equipped. Examples of standard shields:
| Buckler | Wooden Shield | Adarga Shield | Kite Shield | Sipar Shield | Heater Shield |
|---|---|---|---|---|---|

|

|

|

| ||
| +10 + 5 |
+15 +15 |
+15 +20 |
+15 +25 |
+18 +18 |
+20 +15 |
The Shieldwall skill (not available to mercenaries using a Buckler as it is not a "normal" shield) can be used in combat to double shield defense (inclusive of Shield Expert bonus) with a additional +5 bonus for each adjacent ally also using the Shieldwall skill. This tactic can be used to give your front rank mercenaries a big boost to defense when taking a large amount of damage is otherwise inevitable (e.g. needing to advance while under fire from enemy ranged troops).
The Knock Back skill knocks the target away by 1 tile, costs 4AP, 20 Fatigue, and has a flat +25 to hit bonus. Terrain and surround bonuses apply as usual. However unlike regular strikes, Knock Back does no direct damage and its roll is not displayed in the combat log. The game will allow you to use an ability against an enemy that is immune, it will then simply miss. This is relevant because one might assume that a pike's repel ability which both knockbacks and staggers would still apply the stagger effect to an immune enemy, it does not.
Height Level[]
Height levels are used as ground elevations (hills) on the battle map. When standing on them, you gain a bonus to hit chance while enemies suffer a penalty to their chance to hit you.
Changing height level costs more action points and costs more fatigue than walking on the same height layer. The Pathfinder perk eliminates these penalties. The Pathfinder perk is especially useful for polearm or 2H weapon users, as it allows them to change height level and still attack. It is also extremely useful for ranged mercenaries as they gain significant bonuses from having a higher elevation than their targets and the Pathfinder perk facilitates easy repositioning.
There are the following types of height level in-game:
- Flat Ground (0 Height Level)

- 1. Height Level
- 2. Height Level
- 3. Height Level
When standing on a higher height level than your opponent, you gain a +10% chance to hit and they suffer a -10% penalty to hit. It is always advantageous to have the high ground in any battle and the AI will try to occupy the high ground whenever possible, especially their ranged units.
Ranged weapons gain an additional hex of range for each level of height and improved hit chance versus targets at a lower height level.
You only count as being in melee attack range if there is a one level difference of height between opposing characters standing in adjacent hexes. If there are two or more levels of height difference between the hex a character is standing on and an enemy in an adjacent hex, you do not count as being in melee attack range or being in each other's Zone of Control.
Surrounding[]
Surrounding occurs when two or more units are adjacent to another one they fight against. For each unit after the first surrounding, a bonus of +5% melee hit chance is given to allies attacking the surrounded target. Both allies and enemies are affected by surrounding.[6] Stunned brothers or brothers with Ranged Weapons will not contribute to surround bonus.[7] Non-hostile parties, be it Peasants, Mercenaries, Noble House Forces or alike, don't provide surround bonus for your party.
Some Perks can affect surrounding:
- Backstabber doubles the surrounding bonus to melee hit chance to +10%.
- Underdog negates the surrounding bonus to melee hit chance unless completely surrounded - in that case, the bonus is +5% in total. If an attacker has the Backstabber perk, its effect is negated and the normal surrounding bonus is applied instead.
Let's study a case. A Raider is surrounded by your mercenaries Diethelm, Tostig and Erik.
It is Diethelm's turn. Attacking the Raider with his Handaxe, Diethelm benefits from a bonus of +10% hit chance. That is +5% for each ally adjacent to the target after the first. With Backstabber, Diethelm would have benefited from a total bonus of +20% hit chance.
It is now the turn of Gunther, another of your mercenary. Gunther is not adjacent to the surrounded Raider and attacks him with a Longaxe. He will also benefit from a bonus of +10% hit chance, doubled with Backstabber for the same reasons.
Finally, your archer Bernhard acts. He attacks the same Raider with a Hunting Bow. Bernhard will not benefit from any bonus because he is using a Ranged Weapon.
Another case in picture:
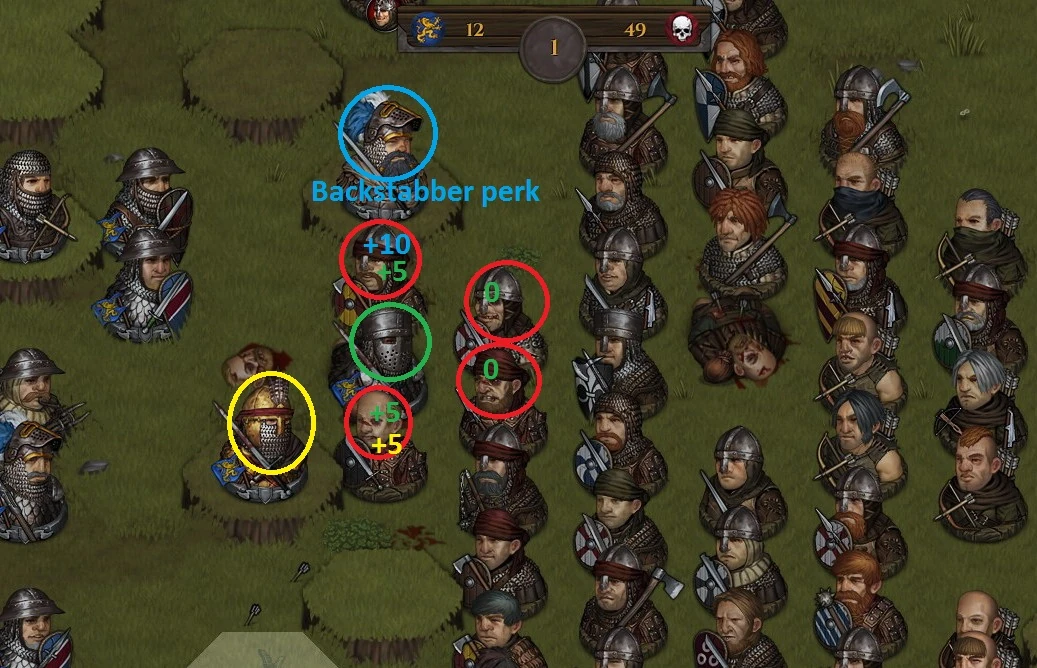 NOTE: It should be noted that in case of friendly melee fire such as the two handed axe round swing, the enemy surround modifier works AGAINST you, which is particularly devastating against Weidergangers as they have backstabber. Meaning in the example above if the blue circled brother was to use his two tile pierce attack against the raider below, and thereby also target the brother circled in green. The chance to hit the green brother with friendly fire would likely be higher than that of hitting the enemy bandit, as the surround multiplier of nearby raiders would apply to the friendly fire attack. This is likely an oversight by the devs.
Perks[]
- Dodge gives a bonus equal to 15% of current Initiative to both Melee Defense and Ranged Defense. Note that Dodge loses effectiveness due to certain injuries which affect Initiative and as a mercenary builds up fatigue during battle (accumulated fatigue lowers Initiative). Dodge is also less effective on characters that are wearing heavier types of armor and using heavy weapons (e.g. Fighting Axe) and even shields as your Initiative is lowered based on the fatigue penalty of equipped weapons, shields, armor and by what is being carried in your bags if it has a fatigue penalty (although this penalty is reduced by 50% while said items are in your bags).
- Shield bonuses to Melee Defense and Ranged Defense can be increased further by using the Shield Expert perk which increases the base defense bonuses of the currently equipped shield by 25%. Unique shields with higher bonuses to defense values make this perk even more potent.
- Some weapon masteries increase the to-hit chance of particular attacks of the related weapon (e.g. Sword Mastery gives the Split and Swing attacks available when using a Greatsword or Warbrand a +5% chance to hit).
- Some other perks give bonuses/maluses to hit chances under specific conditions. They are described in more detail on the Perks page.
Day/Night Cycle[]
Battle Brothers uses a day/night cycle, going through the following phases
- Dawn - Morning - Midday - Afternoon - Evening - Dusk - Night
Battles fought during the night give combatants the Nighttime debuff which gives them penalties of -2 Vision, -30% Ranged Skill and -30% Ranged Defense (if not immune to the effects - e.g. having The Fangshire helmet equipped). As Ranged Skill for both AI ranged troops and human-controlled mercenaries generally tends to be significantly higher than Ranged Defense in most cases, this usually works out in favor of the defender. Thus it is advantageous to attack enemies which have ranged superiority during Nighttime.
Ranged To-Hit Chance[]
Ranged to-hit rolls operate in the same manner as melee to-hit rolls, where to-hit = Ranged Skill of brother subtracted by base Ranged Defense of target. A few additional factors come into play though, besides the usual gear and perk considerations, namely:
- 1. Distance and base accuracy bonus of strike
- Regular bows suffer -4% accuracy per hex with Quickshot (no base accuracy bonus)
- Regular bows suffer -2% accuracy per hex with Aimed Shot (offset by a +10% base accuracy bonus)
- Crossbows suffer -3% accuracy per hex when using the Shoot Bolt skill (offset by +15% base accuracy bonus for the Shoot Bolt skill (only +10% base accuracy bonus if using a Spiked Impaler))
- The first hex from the bowman is NOT counted and does not give penalties for the purposes of to-hit chance calculations.
- Examples:
(a.) Aimed Shot by a Ranged Skill 50 bowman on a Bandit Thug with a Ranged Defense skill of 0 who is 7 hexes away, will have 50% + 10% (Aimed Shot) - 12% (accuracy degradation of 2 for 6 hexes of distance) = 48% to-hit chance.
(b.) Shoot Bolt by a Ranged Skill 50 crossbowman on a Bandit Thug with a Ranged Defense skill of 0 who is 6 hexes away using a Light Crossbow, will have 50% + 15% chance for Shoot Bolt - 15% (accuracy degradation of 3 for 5 hexes of distance) = 50% to-hit chance. - Thrown weapons (e.g. Bundle of Javelins) suffer a penalty of -10% accuracy per hex (offset by a +30% base accuracy bonus). Note that, unlike bows and crossbows, thrown weapons DO count the first hex from the attacker for distance effects on accuracy.
- Regular bows suffer -4% accuracy per hex with Quickshot (no base accuracy bonus)
- 2. Cover (shown as "Line of fire blocked" with it's own unique icon of a shield with an arrow) reduces overall to-hit chance by 75%. This penalty can be reduced to 50% by the Bullseye perk. In the above example (a.), the bowman would only have a 12% to-hit chance on the Bandit Thug if he had cover (e.g he was standing behind another enemy unit or was behind one of your own units. This chance would be improved to 24% with the Bullseye perk making it a core pick for ranged mercenaries.
- The initial roll on whether the shot hits the intended target or its 'Cover' (which could be another unit or an inanimate obstacle) is NOT shown on the battle log though as of release 1.1. The battle log ONLY displays the to-hit roll for the intended or unintended target, without factoring in Cover a second time.[8]
- Ranged attacks confer the debuff granted by the Overwhelm perk to any target struck even if it is not the intended target (e.g. hit on another target due to the scatter mechanic for ranged attacks) or even by a miss on the intended target.
- As with Melee Defense, the Dodge perk and shields also affect Ranged Defense, as does height advantage/disadvantage. The Anticipation perk confers a bonus to Ranged Defense based on the distance from the attacker and on the base Ranged Defense of the defender. The farther the distance from the attacker, the bigger of a bonus Anticipation provides to Ranged Defense. Some enemy units have access to these perks as well (e.g. Goblin Ambushers have the Anticipation perk).
- 3. Scatter is a mechanic whereby a missed ranged attack has a chance to strike an adjacent target, friendly or enemy. Because of scatter, it can be effective to fire into a block of enemy units even if your hit chance on your intended target is low for whatever reason (e.g. due to the line of fire being blocked, due to low ranged skill or due to distance). In this circumstance, you have a reasonable chance to hit something (hopefully an enemy!).
- Ranged attacks via the scatter mechanic can actually strike unintended targets one hex beyond the normal maximum range of the attack in question.
Damage[]
- Main article: Damage
When the target of a skill is hit (intentionally or not) it will receive damage. There are two main types of damage:
- Armor damage
- Hitpoints damage
Each type is rolled separately. Damage dealt and received depends on several factors including the weapon and skill used as well as perks, traits and other modifiers. Armor absorbs and reduces damage taken. This is a simplified formula for calculating armor and hitpoints damage:
armor damage = base damage * modifiers * effectiveness against armor %
1. HP damage = base damage * modifiers * ignoring armor damage % - armor * 0.1
2. if armor = 0 (destroyed), more damage is added (cannot be negative):
   + base damage * modifiers * (1 - ignoring armor damage %) - armor damage you already did
3. if critical hit, everything is multiplied by 1.5:
   HP damage = HP damage * 1.5
For example, using a Billhook to attack an Orc Warrior wearing a Looted Kettle Hat (300) and a Looted Scale Armor (280). The weapon base damage is 60-90, 30% of it ignores armor for 18-27 hp damage and it has 150% effectiveness against armor for 90-135 armor damage
- Orc Warrior is hit in the head (critical hit), resulting in +50% HP damage
- 120 is rolled on armor damage, 27 on hp damage
- Looted Kettle Hat takes 120 damage. 180 armor remains.
- Orc Warrior takes 27 - 18 (10% of remaining armor) = 9 * 1.5 = 13 damage to hitpoints
Secondary damage (bleeding, miasma, etc.) usually bypasses armor and deals a constant amount of damage which can be mitigated with skills like Indomitable.
Split Man[]
Two-Handed Axes' Split Man skill has specific mechanics. The fact that it hits the head on a successful attack has mislead many players into thinking that it always does critical damage.
In fact, Split Man has a standard chance to land a critical hit. If it does, the first strike will hit the head and deal critical damage. If not, the second strike will hit the head for half damage (armor and hitpoints). The second strike always deal half damage whether it hits the body or the head. The second strike can never be a critical hit, do critical damage or benefit from skills that increase critical damage like Chop or Brute trait.
Weapon Durability[]
Weapon durability is important, as when a weapon's or shield's durability reaches zero, the weapon or shield will break.
- Melee weapon durability is lowered by 3 when it strikes armor that has at least 50 durability remaining; weapons are never damaged when they hit flesh (Hitpoints). Durability loss for AoE strikes is calculated separately for each individual hit (ie a Warscythe can lose 9 durability on using Reap, if 3 targets are successfully struck and all 3 hits connect with armor).
- Shield durability is lowered if it is hit by Ranged weapon projectile (bolt/arrow, throwing weapon), by being hit with the Split Shield skill of a weapon (the shield damage will vary based on the weapon doing the splitting) or by randomly being hit with any melee weapon or beast attack when the attempted attack fails but doesn't miss and hits the shield instead (-1 durability for each hit, regardless of weapon).
The Shield Expert Perk reduces the incoming shield damage by half (50%) to a minimum of one, while the Axe Mastery increases axes' Split Shield damage to shields by 50%. - Bow or Crossbow durability is lowered by 2 with each shot.
Morale[]
Morale is one of five states and represents the mental condition of combatants and their effectiveness in battle. At the lowest state, fleeing, a character will be outside your control - although they may eventually rally again. Morale changes as the battle unfolds, with characters that have high resolve less likely to fall to low morale states. Many of your opponents are affected by morale as well.
Morale is represented by a flag icon next to the character portrait (during battle). All units (excluding most Zombies and most Ancient Dead) have Morale status, which varies from Confident to Fleeing, with Steady being the default state. Most Zombies and most Ancient Dead have "Unbreakable" morale, a state that cannot be affected during battle, with no bonuses or penalties to stats.
Effects of Morale on various stats are shown below:
| Morale state | ||||||
|---|---|---|---|---|---|---|
| Confident | 0 | +10% | +10% | +10% | +10% | |
| Steady | 0 | 0 | 0 | 0 | 0 | |
| Wavering | -10% | -10% | -10% | -10% | -10% | |
| Breaking | -20% | -20% | -20% | -20% | -20% | |
| Fleeing | -30% | -30% | -30% | -30% | -30% | |
- All percentages are applied multiplicatively. For example, a unit with 50 Ranged Skill will have an effective 55 Ranged Skill upon receiving Confident status.
- Brothers' starting Morale in battle is rolled based on their Mood. Certain Traits (ie Determined, Dastard, etc) of a character can affect the default starting state.
- Morale checks can change a character's state of morale.
Negative Morale checks (lowers morale state if check fails) are triggered:
1) when engaged in melee by more than one opponent and more than already engaged by this turn -The difficulty is relatively low, but scales with the danger of the opponent closing in (i.e. more likely to fail against an Orc Warrior than a Bandit Thug).[9]
2) when a unit takes 15 or more hp damage (only 1 hp damage required with Fearsome perk).
3) when a friendly unit dies - the more powerful a character is and the closer he is to his allies, the more impact his death has on everyone’s morale, and therefore the higher the morale check difficulty will be in case he is killed).[10]
4) when units like Geists and Ancient Priests use morale affecting skills (Horrific Scream and Horror) - Horrific Scream now triggers 4 small morale checks (since build 0.9).[9]
Positive Morale checks (improves morale state if check succeeds) are triggered:
1) when an opponent is slain - the difficulty of the morale check depends on how powerful and how close the opponent was – a Goblin Chieftain being slain is much more likely to improve everyone’s morale than a random goblin out of a dozen more.[10]
2) when the Rally skill is used - only affects men with Wavering or worse morale: has a chance to regain control of fleeing men and to raise morale (see Rally the Troops perk).
- Unlike hit rolls, Morale check rolls are never shown on the battle log, so no specifics are available, apart from being a roll made to test the Resolve of the character(s) involved.
- Units that fail a morale check/resolve test when they are on Breaking state will panic, change to Fleeing state, are moved to the end of the turn order and try to disengage and flee the battlefield.
- Fleeing characters have no zone of control, allowing opponents to navigate adjacent tiles without penalty.
- Fleeing units can regain their composure and come back to fight, if they pass a morale check (made each turn, given some distance to the nearest enemy). If the check is passed, the character will be returned to a “wavering” morale state and can then act normal again.[10]
References[]
- ↑ Overhype Dev Blog #4
- ↑ RPG Codex Battle Brothers Thread
- ↑ Rap's post on DR
- ↑ In-Depth Perks Guide: Game Mechanics, Defense section
- ↑ Steam Forums Thread
- ↑ Dev Blog #81: Progress Update – Other Improvements
- ↑ Update 1.4
- ↑ Explanation by Rap
- ↑ 9.0 9.1 Steam Forums Thread 2
- ↑ 10.0 10.1 10.2 Overhype Dev Blog #20